BETTER TOUCH BETTER BUSINESS
Contact Sales at Lori.
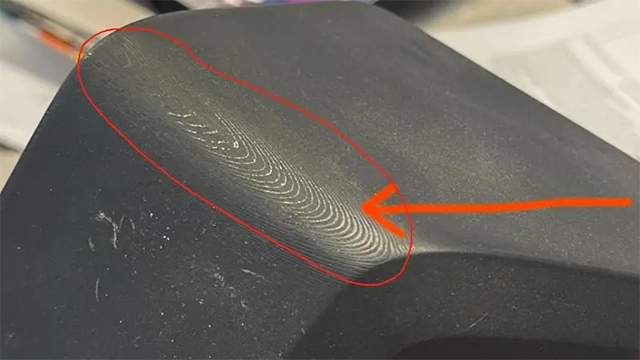
The laminations produced by SLA parts are caused by the way the materials are added and solidified layer by layer during the SLA 3d printing process. Each layer of materials will combine and connect with the next layer, and this adding printing process will form a hierarchical structure, which is called lamination. The laminations usually appear as a series of parallel lines or lines along the stacking direction of each layer, similar to the effect shown in the following figure.

To improve the lamination problem caused by SLA printing, you can take the following solutions:
Adjust the printing temperature: the printing temperature ranges from 20 °C to 40 °C, gradually increase the temperature and test the printing. You can start from a temperature lower than the recommended temperature, gradually increase the temperature by a few degrees each time, and observe the change of the layer pattern. Find a suitable temperature, so that the layer pattern is significantly reduced or disappeared.
Control the printing speed: the general printing speed is usually between 20-60mm/hour, you can start from a lower printing speed, and gradually increase the speed of test printing, observe the change of printing quality, find a balance point, not only to meet the quality requirements, but also to ensure production efficiency.
Reduce the printing layer height: generally speaking, the printing layer height is between 0.05-0.2 mm, but a lower layer height can usually provide higher printing quality, more clear details, so you can adjust the layer height to be lower than 0.1 mm, which can effectively improve the visibility of the layer pattern.
Can optimize part design: When creating 3D models, reduce the visibility of layers by using some techniques. For example, design curves and slopes into smoother shapes rather than directly stacking vertical surfaces.
Adopt post-processing technology to remove layers: it can be polished to remove, or spray paint to cover, after the completion of the print to print, can effectively improve the layers.
Use Smoother or Filler: After printing, you can use a Smoother or Filler to fill in and smooth out the layers. This will make the surface smoother and reduce visible layers.
Copyright © 2025 Shenzhen Lori Technology Co.Ltd. | All Rights Reserved.